

How to Brew Better Coffee at Home: The Complete Guide
Table of Contents
- How to Brew Better Coffee at Home: Start With Fresh Beans
- Coffee Grind Size Chart and Why Consistency Wins
- Best Coffee to Water Ratio for Optimal Extraction
- Importance of Filtered Water for Coffee Quality
- Coffee Brewing Methods Comparison: Finding Your Best Fit
- Extraction, Agitation, and Troubleshooting Flavor
- Step-by-Step Brewing Guides for Your Method
- Common Mistakes That Kill Your Brew Quality
Last Updated: August 4, 2026
How to Brew Better Coffee at Home: Start With Fresh Beans
Learning how to brew better coffee at home begins before water touches grounds. Freshness is the single non-negotiable variable that separates mediocre coffee from exceptional cups. A bag roasted three weeks ago tastes fundamentally different from one roasted three days ago, no matter how perfect your technique.
The roast date matters more than the expiration date. Beans peak between 5-14 days after roasting, when CO2 has stabilized and flavors have developed fully. After 30 days, aromatic compounds fade. By 60 days, you're drinking flat, one-dimensional coffee.
Why Roast Date Matters More Than Expiration
The expiration date on a coffee bag is a legal requirement, not a quality indicator. What matters is the roast date, the actual day the beans came off the roaster. Fresh-roasted beans contain volatile aromatic compounds that make coffee taste alive. These compounds oxidize over time. A bag roasted yesterday tastes brighter and more complex than one roasted two months ago.
Eager Beaver Roasters roasts to order specifically to solve this problem. Beans ship within days of roasting, arriving at your door at peak freshness.
Storage: Keeping Beans Fresh Between Brews
Once beans arrive, storage determines how long they stay fresh. The enemies of coffee freshness are light, heat, oxygen, and moisture. Store beans in an opaque, airtight container away from sunlight in a cool, dark cabinet at room temperature (65-75°F). Avoid refrigerators and freezers, which introduce moisture that accelerates staleness. Buy smaller quantities more frequently, a half-pound bag consumed within two weeks stays fresher than a two-pound bag stretched over two months.
Coffee Grind Size Chart and Why Consistency Wins
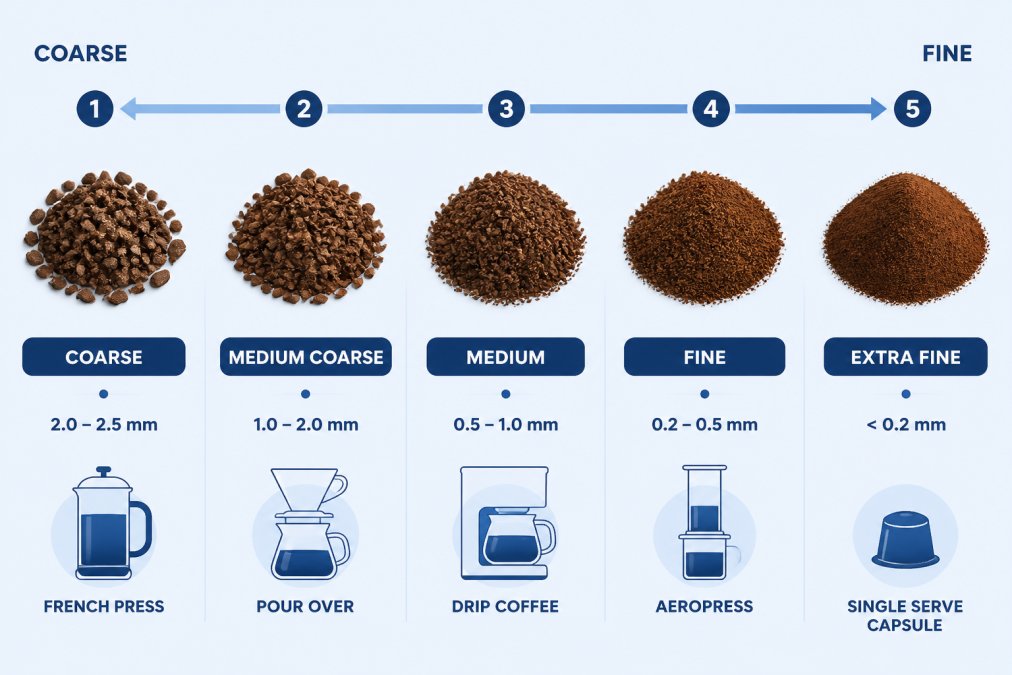
Grind size controls how quickly water extracts flavor from grounds. Too coarse, and water passes through without extracting enough, your coffee tastes sour and weak. Too fine, and water moves too slowly, over-extracting bitter compounds. Consistency matters as much as size. Uneven particles create uneven extraction, resulting in a muddled, unbalanced cup.
Matching Grind to Your Brewing Method
Different brewing methods require different grind sizes because they control water contact time differently.
Coarse grind (like sea salt): French press, cold brew. Brew time: 4-12 hours for cold brew, 4 minutes for French press.

Medium grind (like sand): Drip machines, Moka pots. Brew time: 5-6 minutes.
Medium-fine grind (finer than sand): Pour-over, AeroPress. Brew time: 2-4 minutes.
Fine grind (like powdered sugar): Espresso, Turkish coffee. Brew time: 25-30 seconds for espresso.
Using the wrong grind size creates problems. Coarse grounds in an espresso machine result in channeling, where water flows through without extracting. Fine grounds in a French press over-extract and create sediment.
Burr Grinders vs. Blade Grinders: What Actually Matters
A blade grinder chops beans with rotating blades, producing inconsistent particles. Burr grinders use two rotating burrs to crush beans between them, producing uniform particle size. A decent burr grinder costs $40-150 for home use. This is the single most important equipment investment after your brewing device itself. Spending $50 on a quality burr grinder and $20 on beans produces better coffee than spending $200 on an expensive brewing gadget paired with a blade grinder.
Best Coffee to Water Ratio for Optimal Extraction
The coffee-to-water ratio determines brew strength and extraction. The standard ratio used across specialty coffee is 1:16, one part coffee to 16 parts water by weight. This ratio typically extracts 18-22% of the coffee's soluble material, which is the sweet spot for balanced flavor.
The 1:16 Ratio and When to Adjust
To use the 1:16 ratio, multiply your desired output by the ratio. Want 300g of brewed coffee? Use 300÷16 = 18.75g of coffee. Add 300g of water. Adjust based on your taste preference. Prefer stronger coffee? Try 1:15. Prefer lighter, more delicate flavors? Try 1:17. The ratio is a starting point, not a law.
Using a Digital Scale to Get It Right
A digital scale removes guesswork from coffee brewing. Measuring by volume introduces 10-15% variance depending on how tightly you pack grounds. Weight is consistent. A basic kitchen scale costs $20-40 and lasts years. Look for one that measures in 0.1g increments and has a tare button. Place your brewing device on the scale, hit tare, add coffee until you reach your target weight, hit tare again, and add water to your target weight.
Importance of Filtered Water for Coffee Quality
Water is 98% of your finished cup. Tap water quality varies dramatically by location. Hard water, chlorine, sediment, and mineral imbalances all affect extraction and flavor. Filtered water removes chlorine and some minerals without removing all minerals. Coffee needs some minerals; pure distilled water actually under-extracts because minerals help water dissolve coffee solubles.
Water Temperature and Total Dissolved Solids
Water temperature controls extraction speed. The optimal range is 195-205°F (90-96°C) for most brewing methods. Boiling water (212°F) over-extracts quickly, pulling out bitter compounds. Water below 190°F under-extracts, leaving sour flavors. If your water is too hot, wait 30 seconds after boiling before pouring.
Total dissolved solids (TDS) measures mineral content in water. Water with 150-200 ppm (parts per million) of TDS extracts optimally. Below 100 ppm, water is too "thin" and under-extracts. Above 250 ppm, water is too "hard" and can taste chalky or flat. A simple water test kit costs $10-15.
Coffee Brewing Methods Comparison: Finding Your Best Fit
Five main brewing methods dominate home coffee preparation. Each produces different flavor profiles and requires different techniques.
| Brewing Method | Brew Time | Best For | Cleanup |
|---|---|---|---|
| Pour-Over | 3-4 minutes | Flavor control, light roasts | 2 minutes |
| French Press | 4 minutes | Full body, dark roasts | 3 minutes |
| AeroPress | 2-3 minutes | Versatility, travel | 2 minutes |
| Drip Machine | 5-10 minutes | Convenience, volume | 5 minutes |
| Cold Brew | 12-24 hours | Smooth, low acidity | 5 minutes |
Pour-Over, French Press, and AeroPress Showdown
Pour-over (Chemex, Hario V60, Kalita Wave) uses gravity to pull water through grounds and a paper filter. The filter removes oils and fine particles, producing a clean, bright cup that highlights the coffee's origin flavors. A basic pour-over setup costs $15-50.
French press steeps grounds directly in hot water for 4 minutes, then presses a metal mesh filter down to separate grounds from liquid. The metal filter allows coffee oils to pass through, creating a heavier body and richer mouthfeel than paper-filtered methods. A French press costs $25-80.

AeroPress combines immersion and pressure. Water steeps grounds for 10-45 seconds, then you press a plunger down to force water through a paper filter. The result is clean like pour-over but with slightly more body. AeroPress is fast, forgiving, and travel-friendly. An AeroPress costs $35-45.
Immersion vs. Percolation: What's the Difference
Immersion brewing (French press, cold brew) submerges grounds in water for an extended period. Immersion is forgiving because you can't easily over-extract in the first few minutes. Immersion brews taste heavier and fuller-bodied because oils remain in the cup.
Percolation brewing (pour-over, AeroPress, drip) pulls water through grounds quickly. Extraction happens as water passes through, not while sitting. Percolation requires more precision because contact time is shorter. However, it produces cleaner cups because paper filters remove oils.
Budget-Friendly vs. Pro-Sumer Equipment Setup
A budget-friendly setup costs $50-100 total: a burr grinder ($40-60), a pour-over dripper ($15-20), and a digital scale ($20-30). A pro-sumer setup costs $300-600: a quality burr grinder ($100-150), a gooseneck kettle with temperature control ($80-120), a pour-over or AeroPress ($40-50), a digital scale ($30-50), and a milk frother if needed ($100-200). Start simple. Add equipment only when you've outgrown what you have.
Extraction, Agitation, and Troubleshooting Flavor
Extraction is the process of dissolving coffee solubles into water. Under-extraction means water didn't spend enough time with grounds. Over-extraction means water spent too much time, dissolving too many compounds including bitter ones. Agitation is stirring or swirling the coffee during brewing. It speeds extraction by bringing fresh water into contact with grounds.
Under-Extraction vs. Over-Extraction: Taste the Difference
Under-extracted coffee tastes sour, thin, and weak. The acidity is sharp and unpleasant rather than bright and complex. Under-extraction happens when water is too cool, grounds are too coarse, contact time is too short, or the ratio is too high.
Over-extracted coffee tastes bitter, harsh, and dry. The sweetness disappears and astringency dominates. Over-extraction happens when water is too hot, grounds are too fine, contact time is too long, or the ratio is too low.
If your coffee tastes sour, use hotter water, grind finer, brew longer, or use less coffee. If it tastes bitter, do the opposite: use cooler water, grind coarser, brew shorter, or use more coffee.
Channeling, Bloom Time, and Brew Variables
Channeling occurs when water finds the path of least resistance through grounds instead of flowing evenly. Fix channeling by using a consistent grind size and distributing grounds evenly.
Bloom is the first 30-45 seconds of brewing when grounds are saturated but water hasn't fully percolated. During bloom, CO2 escapes from the beans, making room for water to penetrate. Always pour a small amount of water (twice the weight of your grounds) and wait 30 seconds before continuing.
Reading Your Cup: Acidity, Body, and Bitterness
Acidity is brightness and liveliness in the cup, not sourness. Good acidity tastes clean and complex. Light roasts have higher acidity than dark roasts. If acidity is too high (sour), use hotter water or longer brew time. If too low (flat), use cooler water or shorter brew time.
Body is the weight and texture of the coffee on your tongue. French press produces fuller body than pour-over because oils remain in the cup. If body is too light, use a coarser grind or longer brew time. If too heavy, use a finer grind or shorter brew time.
Bitterness is the harsh, dry sensation at the back of your palate. Some bitterness is normal and pleasant. Excessive bitterness means over-extraction. Use cooler water, grind coarser, or brew shorter.
Step-by-Step Brewing Guides for Your Method
Following a consistent process produces consistent results. These guides use the 1:16 ratio and assume you're using fresh beans and filtered water.
Pour-Over Brewing: Five Simple Steps
Equipment needed: Pour-over dripper, paper filter, digital scale, gooseneck kettle, coffee grounds, water.
Step 1: Prepare your setup [Time: 2 minutes] Place a filter in your dripper and rinse with hot water. This removes paper dust and preheats the dripper. Weigh your coffee and grind to medium-fine consistency.
Step 2: Add grounds and bloom [Time: 1 minute] Pour grounds into the filter and create a small well in the center. Pour just enough hot water (195-205°F) to saturate the grounds, roughly twice the weight of your grounds. Wait 30-45 seconds as CO2 escapes.
Step 3: Pour in stages [Time: 2-3 minutes] Pour water slowly in circular motions, keeping the water level consistent. Pour in stages rather than one continuous pour. Aim to finish pouring by the 3-minute mark.
Step 4: Watch the drip [Time: 1 minute] Let water drip through completely. If it drips too fast, your grind was too coarse. If too slowly, your grind was too fine.
Step 5: Taste and adjust [Immediate] Taste your coffee while hot. Does it taste sour? Next time, use hotter water, grind finer, or pour more slowly. Does it taste bitter? Use cooler water, grind coarser, or pour faster.
Expected result: A clean, bright cup that highlights the coffee's origin flavors. Brew time should total 3-4 minutes.
French Press Steeping: Timing and Technique
Equipment needed: French press, digital scale, kettle, coffee grounds, water.
Step 1: Preheat and measure [Time: 2 minutes] Pour hot water into the French press to preheat it. Discard the water. Weigh your coffee and grind to a coarse consistency (like sea salt).
Step 2: Add grounds and water [Time: 1 minute] Pour grounds into the preheated French press. Pour hot water (195-205°F) in a circular motion, saturating all grounds. Let it sit for 30 seconds without stirring.
Step 3: Stir and cover [Time: 1 minute] Stir gently with a spoon, breaking up the crust that forms on top. Place the lid on top but don't press the plunger yet. Let it sit for 3.5 more minutes.
Step 4: Press slowly [Time: 1 minute] Press the plunger down slowly and steadily over 20-30 seconds. Pressing too fast forces grounds through the filter. Stop when the plunger reaches the grounds.
Step 5: Pour immediately [Immediate] Pour into your cup right away. Coffee left sitting in the French press continues to extract and becomes bitter.
Expected result: A full-bodied, rich cup with visible oils and slight sediment.
Cold Brew and Instant Coffee: When Convenience Counts
Cold brew steeps grounds in cold water for 12-24 hours, producing a smooth cup with low acidity. Use a 1:5 ratio (one part coffee to five parts water). Steep overnight, then strain through a fine mesh or cloth filter. Dilute with water or milk before drinking. Cold brew concentrate lasts two weeks refrigerated.
Instant coffee dissolves in hot water instantly, requiring no brewing equipment or technique. Eager Beaver Roasters Instant Coffee ($22.99) offers 30 servings of quality instant in a resealable pouch. Use when speed matters more than ritual.
Common Mistakes That Kill Your Brew Quality
Most brewing problems trace back to a few repeated mistakes.
Stale beans. This is the biggest culprit. No technique fixes stale coffee. Buy from roasters who print the roast date clearly. Consume within 30 days of roasting. Eager Beaver Roasters ships roasted-to-order, so beans arrive at peak freshness.
Wrong water temperature. Boiling water over-extracts immediately. Water cooler than 190°F under-extracts. Use a thermometer or wait 30 seconds after boiling.
Inconsistent ratios. Guessing at coffee amounts produces inconsistent results. A $20 digital scale fixes this permanently.
Grinding too far in advance. Ground coffee oxidizes quickly. Grind immediately before brewing.
Dirty equipment. Oil buildup creates rancid flavors. Wash your dripper, French press, and AeroPress with hot water and dish soap after each use. Descale your kettle monthly with vinegar.
Ignoring the bloom. Skipping the initial saturation step results in uneven extraction. Always bloom for 30-45 seconds before continuing.
Brewing better coffee at home comes down to one principle: fresh beans, clean water, proper technique, and consistency. The equipment matters less than the fundamentals. A $50 pour-over with fresh Eager Beaver Roasters beans produces better coffee than a $500 espresso machine with stale grocery store grounds.
Start with fresh beans roasted within the last two weeks. Invest in a burr grinder and digital scale. Learn your brewing method's fundamentals. Taste your coffee critically and adjust one variable at a time. Within a few weeks, you'll notice the difference.
Find Your Perfect Roast with Eager Beaver Roasters. We roast fresh to order in light, medium, and dark profiles, ship directly to your door, and guarantee maximum flavor and aroma in every cup.
Frequently Asked Questions
What is the best method for brewing coffee at home?
The best brewing method depends on your preferences and lifestyle. Pour-over offers precision and control, French press delivers full body and richness, and AeroPress provides versatility. Immersion methods like French press steep grounds longer, while percolation methods like pour-over extract faster. Start with what fits your schedule and taste preference, then adjust your grind size, water temperature, and brew time to dial in flavor.
How do I get the best coffee to water ratio?
The standard ratio is 1 part coffee to 16 parts water by weight, though some prefer 1:15 for stronger cups or 1:17 for lighter brews. Use a digital scale to measure both coffee and water precisely. For example, 25 grams of coffee to 400 grams of water. This consistency makes it easy to identify which variables affect your flavor, so you can adjust intentionally rather than guessing.
Why does water quality matter for how to brew better coffee?
Water makes up 98% of your cup, so its quality directly impacts taste. Chlorine and minerals affect extraction and flavor profiles. Filtered water removes chlorine and balances mineral content, improving sweetness and clarity. Unfiltered tap water often tastes flat or bitter. A simple pitcher filter works for most home brewers, though some enthusiasts test total dissolved solids to fine-tune mineral balance for their specific beans and method.
How do I know if my coffee is over-extracted or under-extracted?
Under-extracted coffee tastes sour, thin, and weak because water didn't pull enough flavor from the grounds. Over-extracted coffee tastes bitter, harsh, and dry because water pulled too much. Fix under-extraction by grinding finer, using hotter water, or brewing longer. Fix over-extraction by grinding coarser, lowering water temperature, or reducing brew time. Keep notes on your adjustments so you learn which variables affect your specific setup.
What grind size should I use for my brewing method?
Grind size matches brew time and contact time. French press uses coarse grounds and steeps for 4 minutes, so extraction happens slowly. Pour-over uses medium-fine grounds with faster water flow, around 3 minutes. AeroPress uses fine grounds with shorter contact time. Consistency matters more than perfection. A burr grinder produces uniform particles, while blade grinders create uneven sizes that extract unevenly and produce muddy, bitter flavors.
How fresh should my coffee beans be when I brew?
Beans peak in flavor 5-14 days after roasting, depending on roast level. Light roasts often taste best earlier, while dark roasts can improve slightly longer. Check the roast date on your bag, not the expiration date. Whole beans stay fresher longer than pre-ground coffee. Store in an airtight container away from heat and light. Eager Beaver Roasters roasts to order and ships quickly, so your beans arrive at peak freshness for maximum flavor and aroma.
Do I need expensive equipment to brew better coffee at home?
No. A basic pour-over dripper, paper filters, a burr grinder, and a digital scale cost under $60 combined and produce excellent coffee. French press is even cheaper and requires no filters. Expensive equipment like espresso machines or high-end grinders improves consistency and convenience, but can't fix stale beans or poor technique. Start with fundamentals: fresh beans, correct ratio, proper grind, and right water temperature. Upgrade equipment only after mastering these basics.
This article was written using GrandRanker